Friday, 20 April 2007

Don't write code - use Eclipse


Eclipse IDE provides multiple functionalities which can help you when you are coding. The functionalities what I am talking about are typically very small and easy to use actions such as Content Assistant, Quick Fix, Refactoring and other code manipulations. Usage of those features can improve speed and quality of your coding.

In this article and also in the other articles under label coding tips I would like to describe usage of those features in the way where you will write as little code as possible and the rest of code will be generated by Eclipse.

Let start with very simple example - assignment of new instance of StringBuffer class to the local variable or to the field.

So what we want to have at the and will be something like:

StringBuffer buffer = new StringBuffer();

Steps:
  • write keyword 'new'
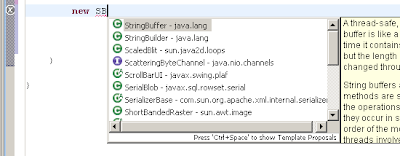
  • write 'S' and push Ctrl+Space (shortcut for Content Assistant)
    you can see list of classes, interfaces and templates starting with 'S'
  • you can specify more accurately the name of requested class writing its following letters 'tr' or using Camel feature - just write 'B' as a Buffer. Then navigate selection to StringBuffer class.
  • press Enter. The name of the class is generated.
  • write '(' as an open parenthesis (the closing parenthesis is generated automatically) for constructor parameters and and push Ctrl+Space again.
  • select constructor you want to use and press Enter

  • write down the parameter values for the constructor, press End button, add semicolon ';' and save (off course using Ctr+S shortcut).
  • press Ctrl+1 (cursor should be somewhere on the line code). It is shortcut for Quick Fix proposal.

  • choose one of the proposals and press Enter. The Eclipse then generates all necessary code to have it compile able.
    For more advanced usage you can use direct shortcuts for proposed actions (you can see them in the proposal) - Ctrl+2, L for assignment to local variable and Ctrl+2, F for assignment to field.
    It also provides you possibility to give a name of created variable or field.

  • When you are sure about the name of the variable press Enter. It will offer you to specify type of variable in more detail. Of course the proposed types are super types of the type you instantiated.

  • When you will choose the right type press siply Enter again and once more for finalization.


Now we have what we wanted (55 characters) using 28 key presses.

Wednesday, 11 April 2007

Interceptor Design Pattern

Usage of Interceptor Design Pattern [POSA2] can solve many problems in daily development. It is very easy to:

  • monitor what is the application doing inside
  • provide possibility to change some of application's behavior
  • provide possibility to extend application with new features
    • implementer of the extension need not to know rest of the application
    • implementer of the extension need not change existing code
    • new extensions can or can not affect current system
Interceptor design pattern is built from three basic components:
  1. IInterceptor interface
  2. Dispatcher
  3. Context

IInterceptor - IInterceptor interface can define arbitrary number of operations which are executed by Dispatcher in specific cases (at the beginning of the request processing or at the end of the request processing). There is typically just one parameter for every method - Context - carrying input and output data. The interface is then implemented by specific interceptors (logging, authorization, transaction, ...).

Dispatcher - Dispatcher class typically implements IInterceptor interface. There are many ways how the dispatching can be implemented. For example the interceptors called by Dispatcher can be prioritized or exception thrown from interceptor can be handled as interception termination. The Dispatcher is the class which is called from "intercepting point" to perform intercepting.

Context - Context is typically simple data object used to carry data for interceptors or to keep results of intercepting (eg. transaction id generated by TransactionInterceptor). There can be different Context implementations not only for different IInterceptor interfaces but also for different methods of IInterceptor interface.


As mentioned in description of basic elements the Interceptor pattern has many degree of freedom:
  1. IInterceptor
    • one/many methods
    • one/many Context types for many methods
    • result propagation to Dispatcher, intercepting point or following interceptors
      • Context - Dispatcher can decide about next step by status of the Context
      • Exception - Dispatcher can handle different exceptions different way
  2. Dispatcher
    • implements/does not implement IInterceptor interface
    • dispatching mechanism (prioritized, random, based on context, ...)
Implementation of Interceptor Pattern is not the easiest work. But whenever it is implemented it is very simple to extend application by new features or change its behavior.

Related patterns:
  • Template Method [GoF]
    • Very simple version of Interceptor Pattern implementing Dispatcher (template method) and IInterceptor implementations (methods called from template method) in one class.
  • Chain of Responsibility [GoF]
    • Does not have Dispatcher - the order of "interceptors" is defined as chain of successors.
  • Intercepting Filter
    • Similar also to Chain of Responsibility but the chain of successors is not "hard coded" but propagated to "interceptor" as parameter of the method call.

References: